User authentication
AtoM defaults to using local user authentication, which stores user details such as email addresses and passwords in the AtoM database. It is possible to configure AtoM to instead integrate with existing Single sign-on services using the CAS or LDAP protocols.
Jump to:
- Enabling CAS authentication
- Setting AtoM group membership from CAS user attributes
- Enabling LDAP authentication
Enabling CAS authentication
AtoM can be configured to authenticate users using (CAS) Single Sign-On instead of local authentication. When this is enabled, users attempting to log in will be redirected to a CAS server for authentication. After successfully authenticating, a user account will be created for them in AtoM if one does not exist already. Logging out from AtoM will then log the user out from both AtoM and the CAS server.
Enabling CAS authentication requires manually editing a few AtoM config files. For more information on how to do this, see Manage AtoM configuration files.
The first thing to do is to activate the arCasPlugin. This can be done by
by adding the plugin name to the $plugins array in
config/ProjectConfiguration.class.php.
Important
While the plugin could technically be enabled by an administrator
logging in and enabling it in the user interface via  Admin > Plugins, doing so would require authenticating locally without
CAS enabled - and the additional configuration file changes described below
will not yet be in place.
Admin > Plugins, doing so would require authenticating locally without
CAS enabled - and the additional configuration file changes described below
will not yet be in place.
For security best practices, we recommend a system administrator enable the plugin using the method described above, so no local authentication accounts are stored in AtoM when the intention is to use CAS.
Next, configure the CAS settings (CAS version, server name, server port, server
path, and server SSL certificate) in the arCasPlugin’s app.yml config
file with the details of the CAS server you wish to use for authentication.
AtoM supports use of CAS versions 1.0, 2.0, and 3.0. The plugin’s
default settings make use of a public demo CAS server which can be used for
testing basic CAS login and logout functionality using the username admin
and password django-cas-ng.
Warning
While CAS server SSL validation can be disabled for development, we strongly discourage doing so in a production environment.
For further information and additional configuration options, see the Manage AtoM configuration files documentation - specifically:
Next, change the default login module to cas in
apps/qubit/config/settings.yml.
Finally, change the user class to casUser in
apps/qubit/config/factories.yml.
Tip
Whenever you make changes to AtoM’s configuration files, remember to clear the cache and restart PHP-FPM to apply the changes. See:
Setting AtoM group membership from CAS user attributes
AtoM CAS support can be optionally configured to automatically set each user’s AtoM user group membership based on the presence or absence of expected values in user attributes returned by a CAS server during authentication. When enabled, this entitlement check occurs on each login so that changes made to group membership on the CAS server are reflected in AtoM on the next login.
Important
Use of this feature requires CAS version 3.0. Earlier versions of the CAS protocol do not support release of user attributes.
This feature is enabled via settings in the the arCasPlugin’s app.yml
config file.
First, enable the feature by setting set_groups_from_attributes to
true.
Next, set the CAS attribute whose values will be checked to determine group
membership in attribute_key.
Finally, set the attribute_value of each group in user_groups to match
the expected value for that group in the CAS attributes.
Groups can be added or removed from user_groups as desired. Only groups
that are properly configured with an attribute_value and a valid
group_id will be used to set AtoM group membership on login.
Note
When this option is enabled, any changes that an administrator makes in AtoM to a user’s group membership will not persist and be overwritten on the next CAS login.
Enabling LDAP authentication
AtoM can also be configured to authenticate users using (LDAP ), an “open, vendor-neutral, industry standard application protocol for accessing and maintaining distributed directory information services over an Internet Protocol (IP) network” (Wikipedia). When this is enabled, users attempting to log in will use the credentials associated with their LDAP account, instead of local account credentials, when logging in to AtoM.
Enabling LDAP authentication in AtoM requires manually editing a few AtoM configuration files. For more general information on how to do this, see Manage AtoM configuration files.
First, we’ll need to make a small change in the config/factories.yml
configuration file. You can open this file with nano or another text editor
to make the changes. Starting from AtoM’s root installation directory, run:
sudo nano config/factories.yml
Important
If you are making these changes on an AtoM installation after it has
already been installed and configured, then the file you should modify will be
found at apps/qubit/config/factories.yml.
During the final configuration steps of the installation process, AtoM will
copy the default values from the original config/factories version into
a new apps/qubit/config/factories.yml version, which will take precedence
going forward. If your AtoM installation is already complete, this second one
will be the file you’ll want to change.
If you’re not sure, check for a file at apps/qubit/config/factories.yml
while making changes. If it exists, make the changes in this file. Note that
applying the changes in both files will work fine as well.
In the file you’ll find the following section:
user:
  class: myUser
  param:
    timeout: 1800 # Session timeout in seconds
Change the myUser value to ldapUser:
user:
  class: ldapUser
Exit and save your changes, and the clear the application cache and restart PHP-FPM.
After doing so, a new configuration section will be available in
Admin > Settings, where you can define your LDAP authentication settings:
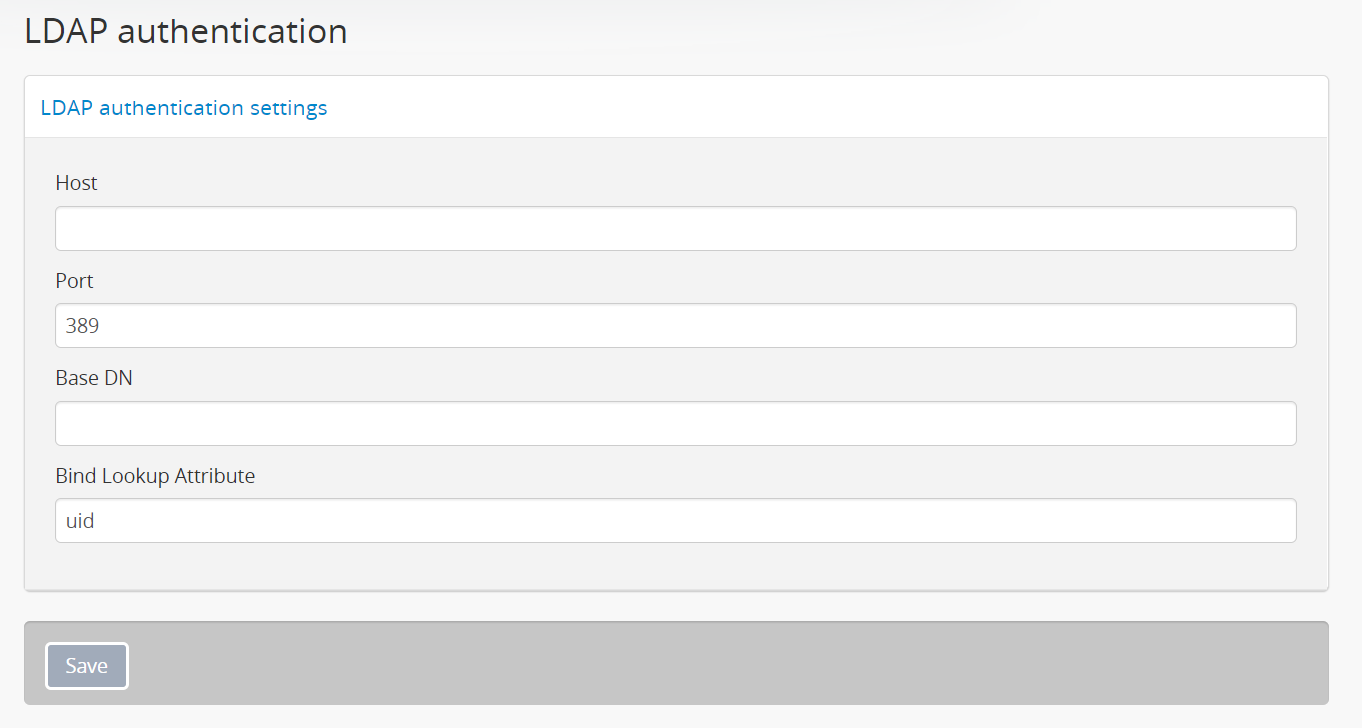
The Host field expects the hostname or IP address of the LDAP server.
The Port field should be the port on which your LDAP server will listen for
connections. The industry standard default port for LDAP connections is 389
- by default, AtoM will populate this field with 389. Try this if you’re not
sure what port your LDAP server is using.
Base DN and Bind Lookup Attribute - overview
These two elements are what AtoM will use to determine which LDAP entry the authentication attempt should be compared against.
The Base DN will provide AtoM with the common parts of an LDAP entry on your server that won’t change per user - basically, where to look in the LDAP directory tree to find general user information.
Every LDAP entry consists of a set of attributes. LDAP entries are stored in a tree-like directory structure, so the information provided in this field should give AtoM enough information to find the subdirectory that contains your unique users. Configuring this field in AtoM will require an understanding of how your LDAP server is configured.
Every LDAP entry will have a Distinguished Name (DN) that uniquely identifies that entry and its position in the directory information tree (DIT) hierarchy, similar to the path to a file on a filesystem.
Each LDAP DN is composed of zero or more elements called relative distinguished names (RDNs), and each RDN is composed of at least one attribute-value pairs. There are several commonly used attributes, such as:
- cn: Common name. For example, “John Doe”
- sn: Surname. For example, “Doe”
- uid: User ID. Because a DN indicates directory location, it’s possible a
DN may change over the lifetime of the entry, for example if an entry is moved
within the directory’s information tree hierarchy. Including a unique ID for
each entry means this can be used in a DN. For example,
jdoe01. - dc: Domain component. For example, If the base domain name of the LDAP
server is found at
ldap.example.com, then the domain components for an entry might bedc=ldap,dc=example,dc=comwith each part of the full domain being one domain component. - mail: Email address associated with the entry. For example, `` john.doe@example.com``.
- ou: Organizational unit. Typically represents a directory used in your
LDAP directory hierarchy, such as
Users. - userPassword: the password associated with the particular user defined in the LDAP entry.
There are a number of other attribute key-value pairs often used as well for capturing additional information about the entry and its location in the directory tree, but those listed above include the elements we need to configure AtoM’s Base DN.
Meanwhile, the Bind Lookup Attribute setting in AtoM will specify which attribute should be used to uniquely identify the user. This attribute value will tell AtoM which LDAP attribute to compare against the value entered into the “Email” field in AtoM’s login panel. While the Base DN values will be common to all LDAP entries, the attribute selected for Lookup should be unique. An example:
dn: uid=jdoe01,ou=atomUsers,dc=example,dc=com
    ^^^        ^^^^^^^^^^^^^^^^^^^^^^^^^^^^^^
    Lookup     Base DN
When authenticating a user, AtoM will use the Base DN and Bind Lookup Attribute values together to identify the relevant target LDAP entry that is used for validating the authentication attempt. This means:
- Whatever is set as the Bind Lookup Attribute in AtoM’s settings should match what users logging in with LDAP will enter into the AtoM login panel’s “Email” field.
- Whatever password a user enters into the AtoM login panel’s “Password” field
should match the
userPasswordvalue in their LDAP directory entry.
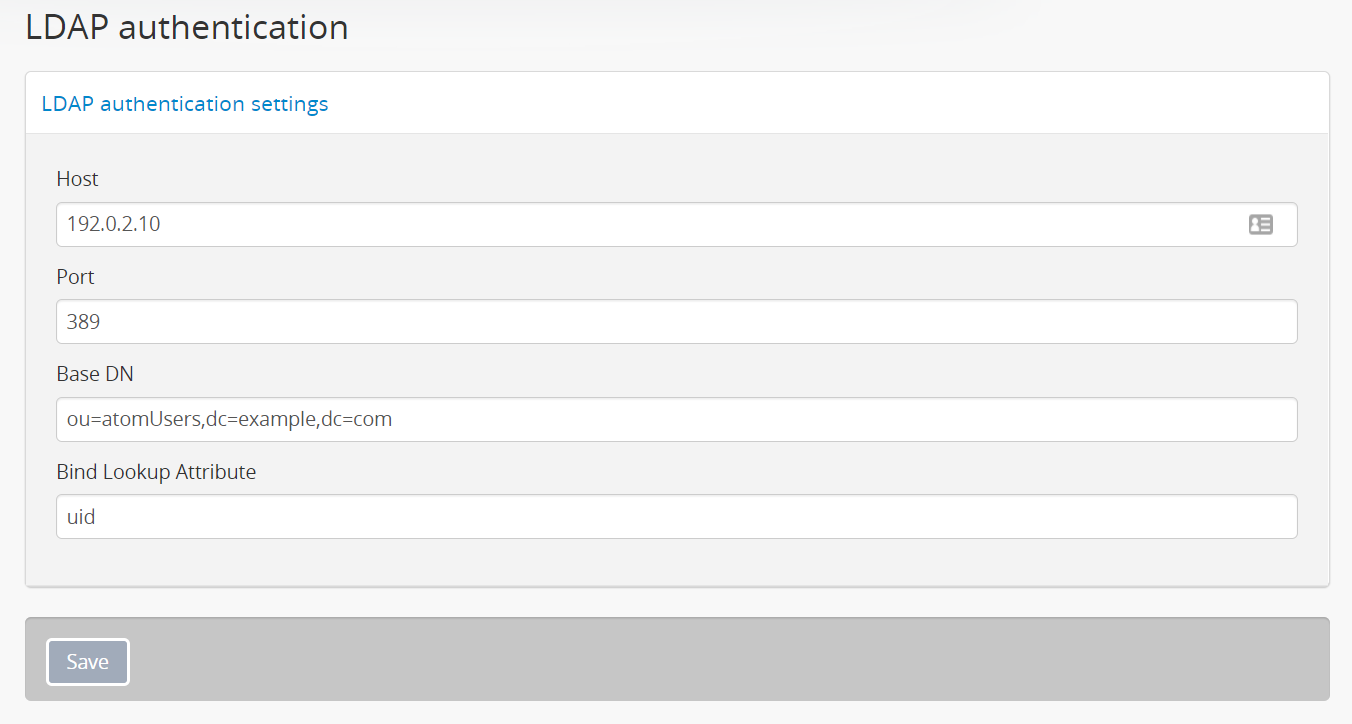
Configuring the Base DN and Bind Lookup Attribute settings
The Base DN setting in AtoM must include any ou (organizational unit)
directory component that target users are contained in on the LDAP server, plus
any domain components (dc) required to find the information. AtoM will use
this to be able to find where individual LDAP entries are stored within the
LDAP server’s directory tree. each attribute key/value pair should be entered
separated by commas, with no spaces between them.
For example, if the target LDAP server has user accounts in an
Organizational Unit called “atomUsers” on a server with a domain of
example.com, then the Base DN setting in AtoM would be entered as:
ou=atomUsers,dc=example,dc=com
The Bind Lookup Attribute should be whatever attribute in your LDAP entries
will be globally unique, unlikely to change, and used to identify individual
users. If you want the login experience to match AtoM’s current expectations
(using an email address in the username field) and your LDAP server is configured
to use mail attributes for every user, then you would enter mail into
this field.
If mail is not used in your LDAP server, uid is a good option, as this
typically shouldn’t change even if the entry moves in the LDAP directory tree.
Barring that, cn could be used. Whatever is picked will define what type of
information end users attempting to authenticate in AtoM should enter into the
login panel’s “Email” field.
In the above example, users would enter their LDAP username into AtoM’s
“Email” field in the login menu. If cn were used as the lookup attribute
instead, then users would need to enter their LDAP common name.
After configuring the LDAP settings
Once configured, users registered on the LDAP server should now be able to authenticate with their LDAP credentials to log into AtoM.
When a user authenticates for the first time, a new AtoM user is created in the database. However, by default, this user is not assigned to any user groups, and will therefore only have the base permissions of the Authenticated user group. An administrator can modify the user permissions after the new user has been created using AtoM’s permissions module - for more information, see:
Important
If switching to LDAP authentication after creating and configuring local user accounts in AtoM, the most secure method to transition will likely be to delete the local user accounts and let the LDAP authentication create new ones, so that no passwords are stored in AtoM and no duplicate accounts exist.
The following points summarize how AtoM will attempt to validate authentication attempts when there are existing user accounts:
- As a first step, AtoM will check if a local account matches the user credentials if no LDAP match is found. This can allow users with existing local accounts to bypass the LDAP authentication, and/or continue accessing AtoM even if the LDAP entry is removed.
- If a match IS found, AtoM will attempt to look for existing accounts by comparing the LDAP lookup attribute (user name, etc) against the emails stored in AtoM’s user table (which are used for local authentication). This means that if the lookup attribute configured is not
- If no local account match is found, AtoM will create a new default user, whose only initial permissions in AtoM will be those of the Authenticated user group. No password will be stored in AtoM with this method, since the LDAP server handles authentication. This is the default behavior in AtoM when LDAP is enabled and no user accounts are present.