Physical storage
AtoM allows archival institutions to create relationships between archival descriptions and accession records and their associated physical storage containers and locations. Details on how to create, manage, link, and delete physical storage containers are included below.
Jump to:
- Manage physical storage types
- Link physical storage
- Browse and manage physical storage
- Visibility and physical storage
See also
Manage physical storage types
Institutions can change and manage the terms used to describe physical object containers and locations by using the Physical Object Type taxonomy:
Click on the  Manage menu, then on
Taxonomies. From the list, click on Physical Object Type.
Manage menu, then on
Taxonomies. From the list, click on Physical Object Type.
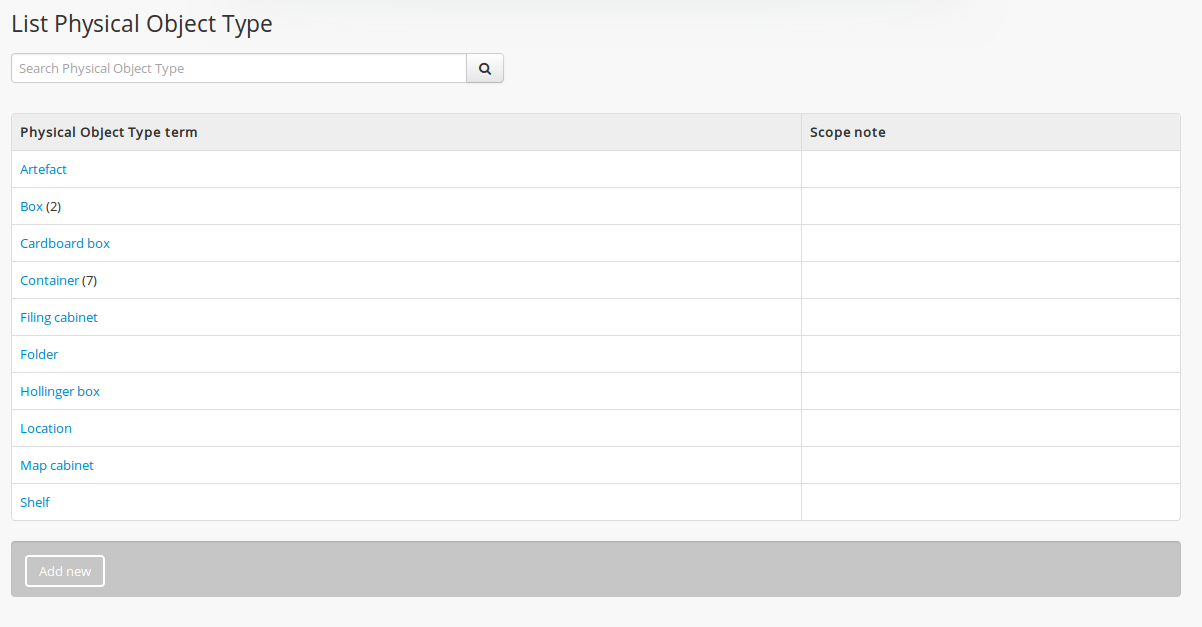
By clicking on an object type, you can view the object type in the taxonomy, displaying hierarchical terms if applicable.

The default hierarchy in the Physical Object type taxonomy in AtoM is as follows:
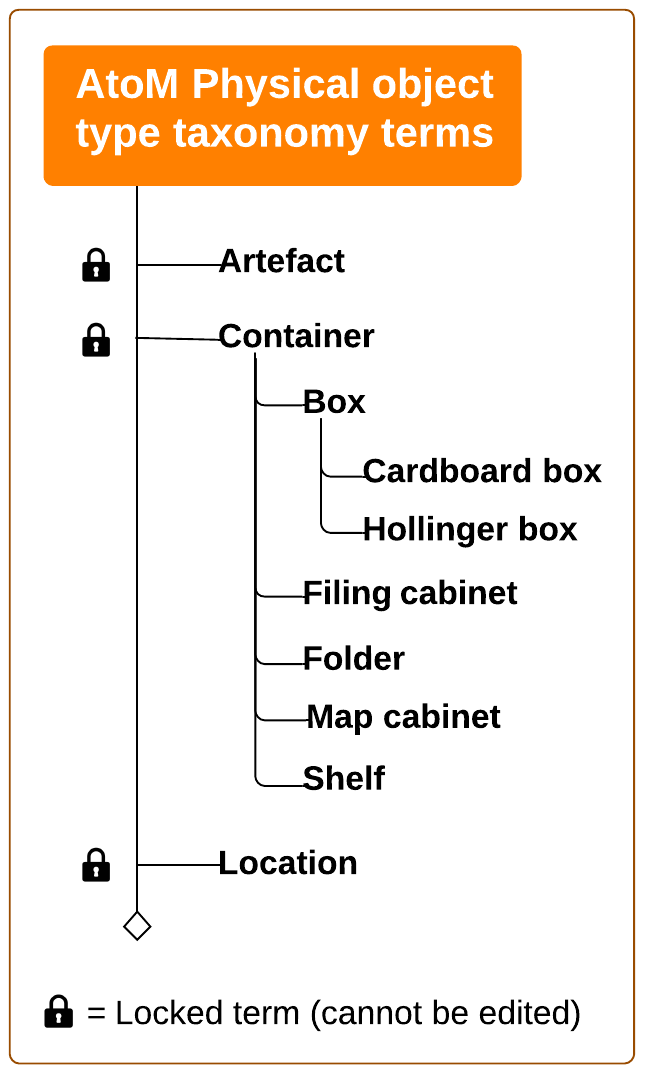
The intended use is for “Containers” to include specific storage containers, such as box numbers, cabinet drawers, etc., and for “Locations” to include more general storage locations, such as “Cold storage,” “Vault,” etc. Storage types and uses can be customized to meet institutional practices, however in order to link a custom storage container to a new or existing archival description you must nest the storage container under “Container.”
For more information on working with terms and taxonomies in AtoM, see: Terms.
Edit storage types
All storage terms except “Artefact”, “Container” and “Location” can be edited or deleted by authenticated users (for more information about locked terms, see Terms).
Click on the name of a Physical Object Type, then click on edit:
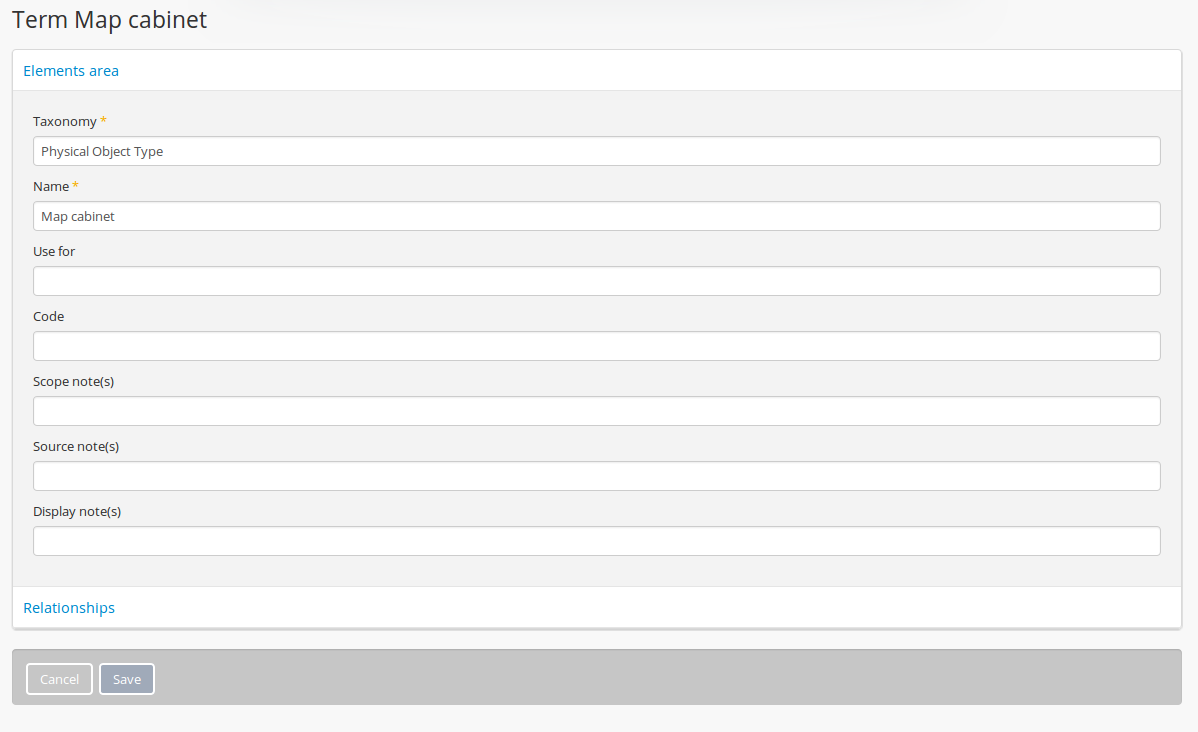
From here, the name of the physical object type can be changed, and internal notes, codes and uses can be added.
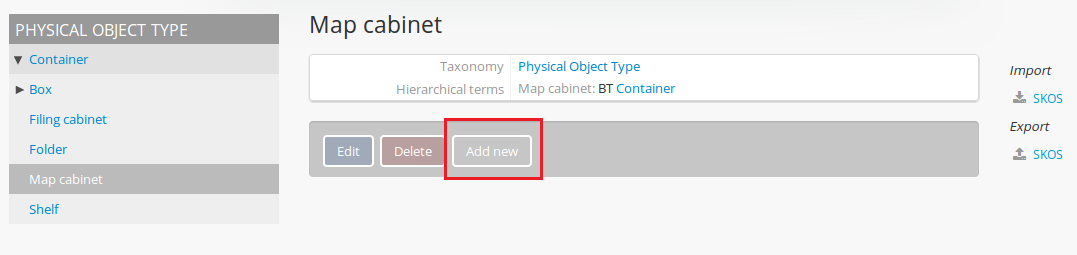
By clicking on the Relationships area, the term’s placement in the hierarchy can be altered and new narrow terms can be added:
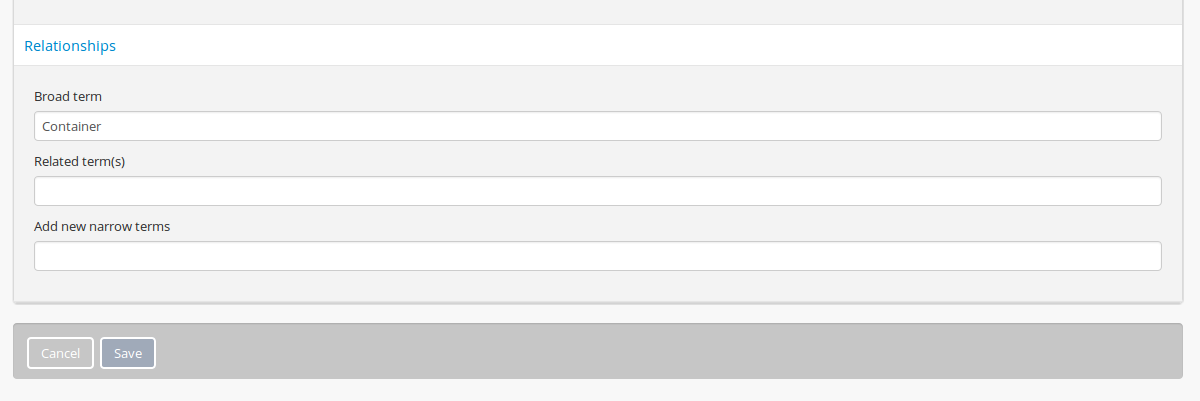
Click on save to save your changes.
Add storage types
New physical storage types can be created by clicking “Add new” in the button block located on the Physical Object Type taxonomy view page:
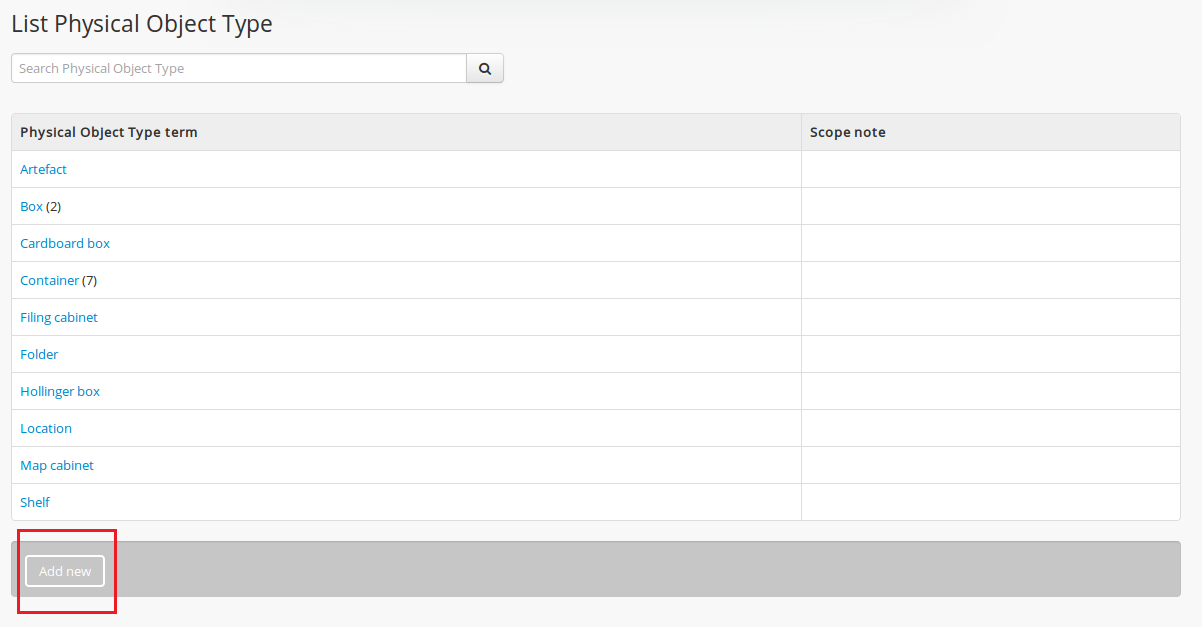
Another method of adding a new storage type is to click “Add new” when viewing an existing Physical Object type. This will automatically nest the new term as a child of the existing term.
Note
This is the method to use if you wish to add a storage container to link to archival descriptions. Find “Container,” and click “Add new.”
Link physical storage
Linking archival descriptions and/or accession records to physical storage locations is performed from the view page of the related record. For archival descriptions, physical storage containers can be linked at any level of description.
It’s possible to add multiple physical storage links to a single description or accession - similarly, a single storage container might be linked to multiple descriptions or accessions. While linking physical storage to a target record, you can create new storage containers on the fly as well as link to existing storage containers from the same screen. The instructions below will outline these options separately, but they can be performed as one single user edit if desired.
Jump to:
See also
Add, change, or remove container links
Note
The following screenshots will use archival descriptions as an example, but the process is the same for accession records.
- Navigate to the view page of the record to which you would like to link a physical storage container. Scroll to the bottom of the view page and click on the “More” button in the button block, and then select “Link physical storage”:
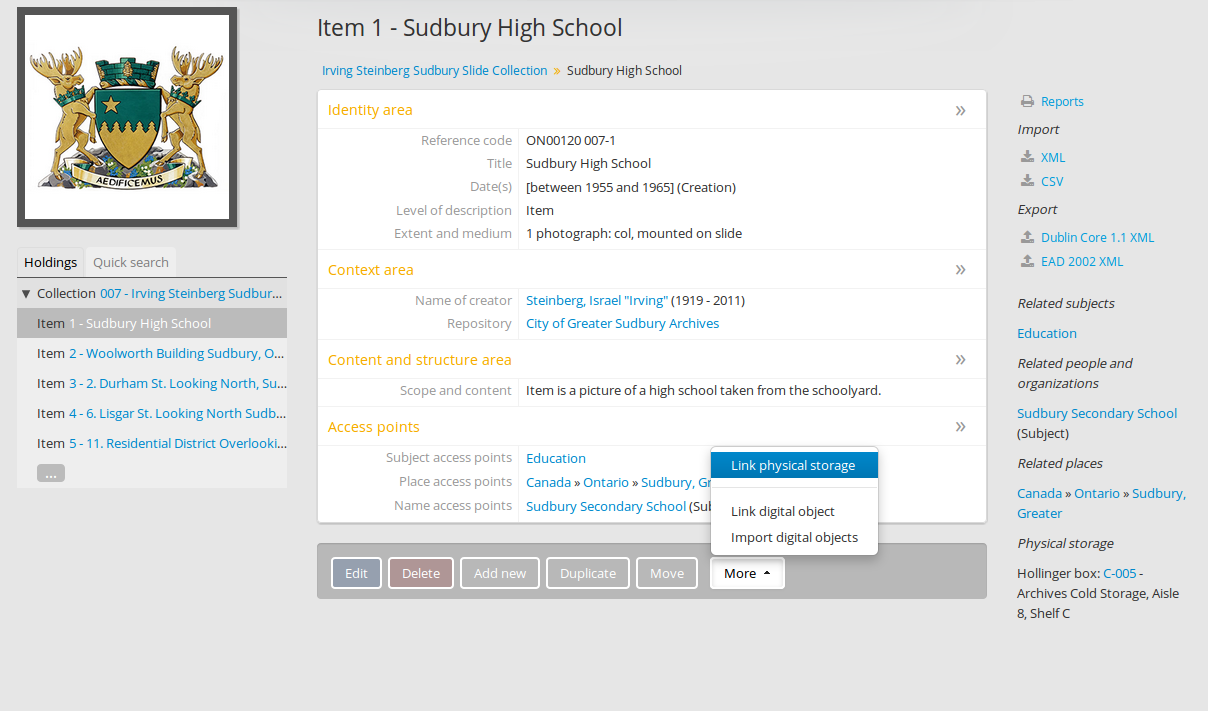
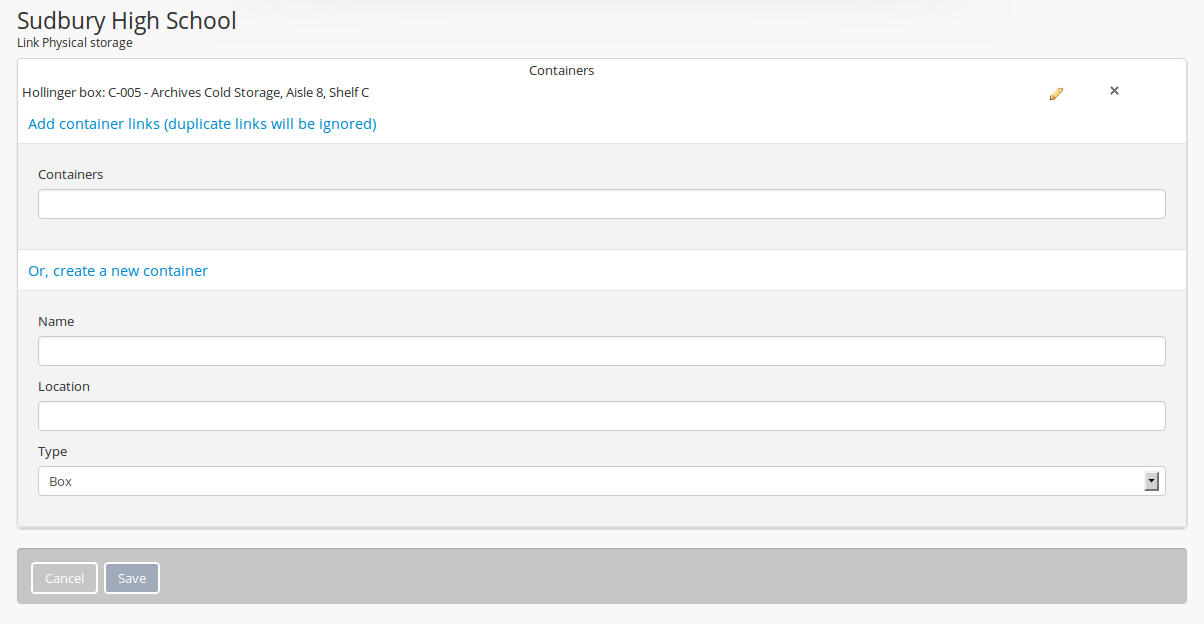
- AtoM will redirect you to the Link physical storage edit page. If a link to a physical storage container or location already exists, it can be edited by clicking the pencil icon, or deleted by clicking the X.
Important
This edits the information associated with the Physical storage container and location. If you change this information the change will apply across all records associated with the container.
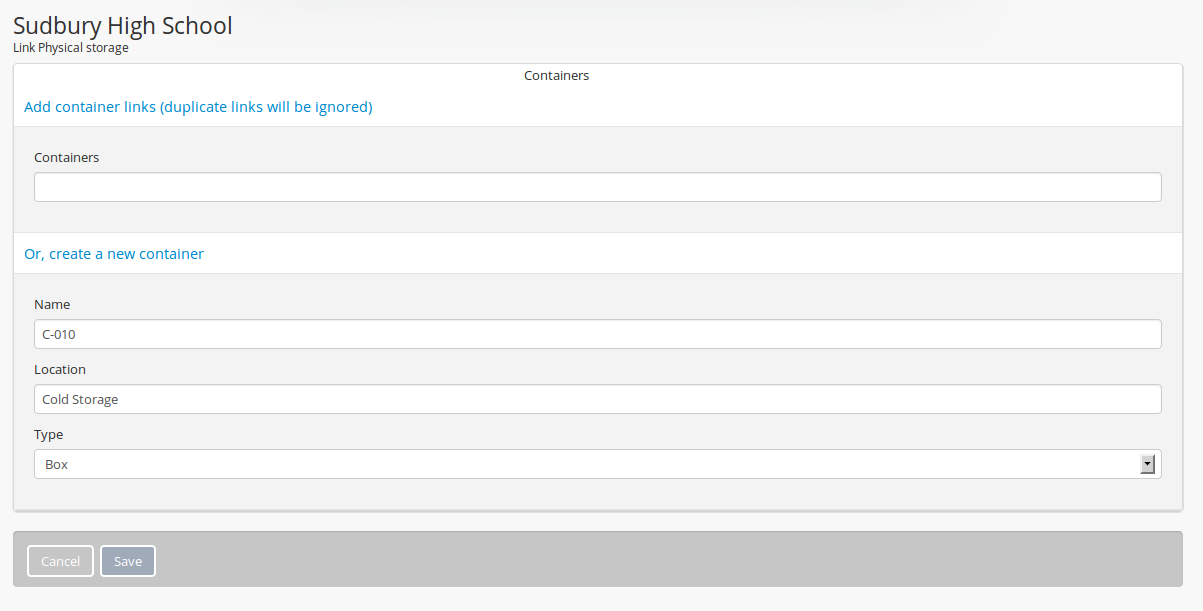
- To create a link with a different existing storage container, begin to type the container name in the Container field. AtoM will auto-suggest existing containers as you type. When you see the target container, click on it in the autocomplete drop-down menu to select it.
- You can repeat this process as needed to add multiple containers. When you are finished, click the Save button in the button block at the bottom of the edit page to save your work. After saving, AtoM will redirect you to the view page of the related record. You will see the linked physical storage container(s) listed in the right-hand context menu.
Create a new container on the fly
To link an archival description or accession record with a new container that does not yet exist in AtoM, follow step 1 in the instructions above - that is, start from the view page of the target record; click the “More” button; and select “Link physical storage.” AtoM will redirect you to the Link physical storage edit page, where we can create new physical storage containers on the fly, as well as edit and/or remove existing container links. To create a new physical storage container on the fly to link to your record:
- Scroll to the bottom half of the edit page, with the area header of “Or, create a new container.” In the edit fields of this section, enter a container name and location, and select a container type from the drop-down menu in the Type field.
Note
The “Type” drop-down menu is associated with the
“Physical Object Type” taxonomy. Users with sufficient access
permissions can modify, delete, and add new
storage container types via Manage > Taxonomies, but you
cannot create new types on the fly via this drop-down menu.
For more information, see:
- When you are done adding your new container, click the “Save” button found in the button block at the bottom of the edit page. AtoM will redirect you to the related record’s view page, and you should see your new linked physical storage container listed in the right-hand context menu.
Tip
New physical storage containers can also be created from the Browse physical
storage area, by navigating to Manage > Physical storage,
and clicking the “Add new” button in the button block at the bottom
of the page.
Browse and manage physical storage
Physical storage can be browsed by authenticated (logged in) users with
sufficient access permissions through
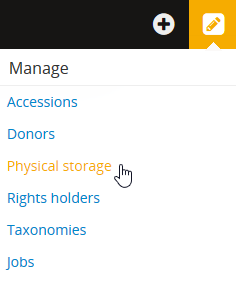
the Manage menu:
Once in Browse Physical storage, users have the option of sorting the storage entries by Name (of container) or Location by clicking in the first row of the Physical storage table:

From here, you can now:
Add a new container from the physical storage module
From the Browse physical storage page, you can add new physical storage containers by clicking the “Add new” button in the button block at the bottom of the page.
Once clicked, AtoM will redirect you to an edit page where you can add more information about your new storage container.
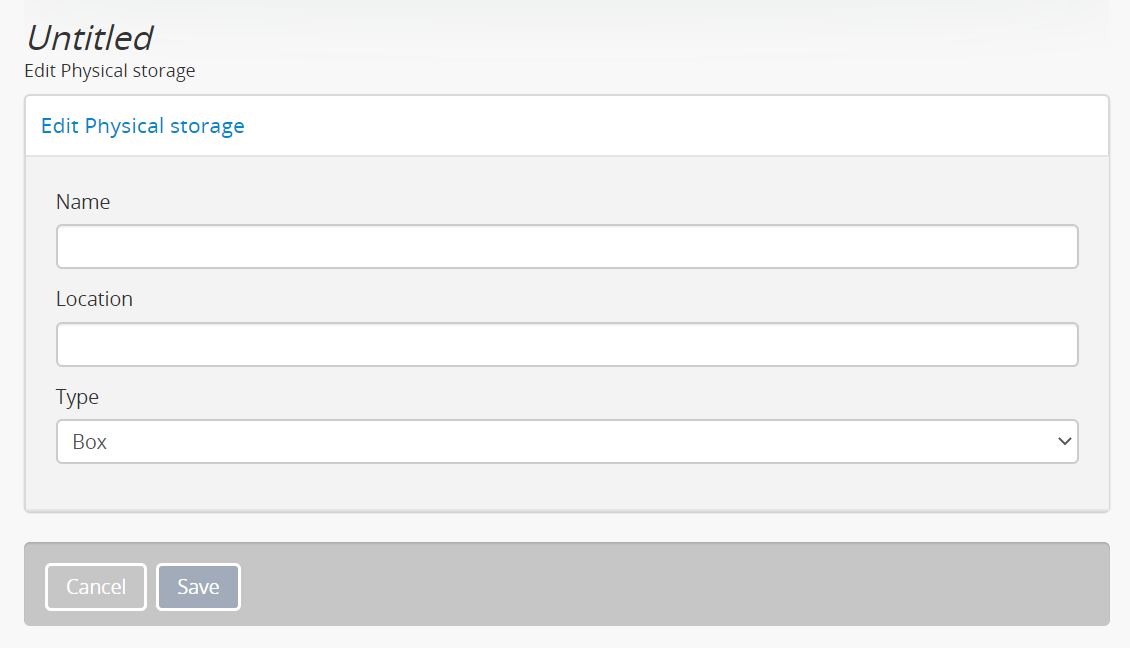
The “Name” and “Location” edit fields are free-text - enter a unique name for your storage container (to better be able to distinguish it when browsing, and when using the autocomplete fields to link related records to the container), and a meaningful location that will help you retrieve the container.
The “Type” field is a drop-down menu associated with the “Physical Object Type” taxonomy. You can select an existing value from the drop-down menu, but you can’t add new values on this screen.
Tip
Users with sufficient access permissions can
modify, delete, and add new storage container types via
Manage > Taxonomies. For more information, see:
When you are happy with your edits, click the “Save” button in the button block at the bottom of the edit page. AtoM will save the changes and display the view page for the new physical storage container. You can click the “Edit” button on the view page to re-enter edit mode and make further changes, or the “Delete” button to delete it.
To return to the Physical storage browse page, use the
Manage menu in the AtoM header bar, and
select “Physical storage.”
View and edit existing storage containers
Starting from the Browse physical storage page, when a user clicks on a container name in the browse results, AtoM will redirect the user to the view page of the selected container, and display a list of the resources associated with the selected storage container:
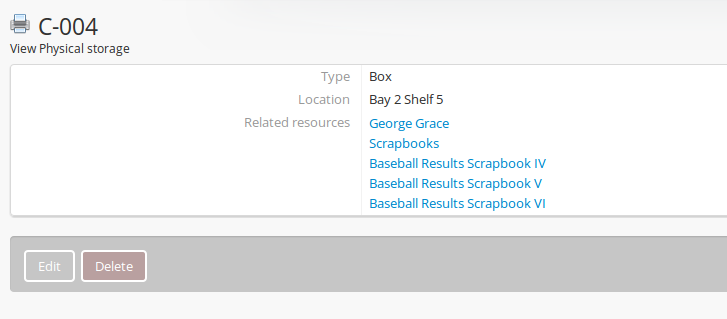
Clicking one of the blue hyperlinks listed under the Related resources will redirect you to the view page for the related record.
Alternatively, by clicking the print icon next to the container name, you can generate a simple HTML report (formatted for printing) for the storage container that includes the Reference code, Title, Dates, Part of (fonds or collection name) and Conditions governing access of any related archival descriptions.

Note
At this time, the container report does not include related accession records linked to the physical storage container - though these will be displayed on the view page of the container.
See also: Create physical storage report for a single container
Click “close” to return to the container storage view page.
Finally, the button block at the bottom of the storage container’s view page contains two buttons - Edit and Delete.
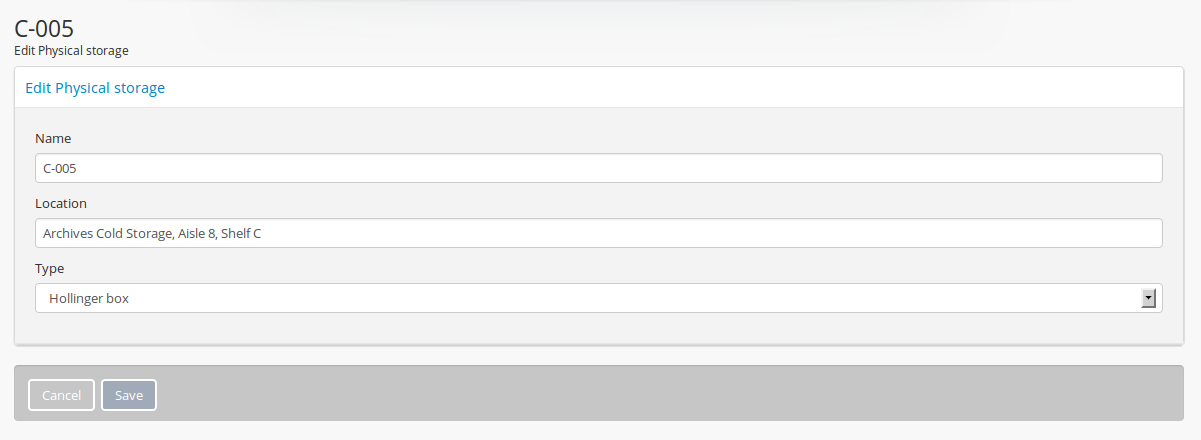
Clicking the Edit button will redirect you to the edit page for the current physical storage container, where you can edit the information associated with the container, including the container name, location and type.
Note
You cannot edit the related records linked to the physical storage container from this screen. To change the records associated with the container, you must do so from the related archival description or accession record for each resource. For more information, see above: Add, change, or remove container links.
In the edit page of the container, the “Type” drop-down menu is
associated with the “Physical Object Type” taxonomy. You can choose
different a taxonomy term in this edit page, but you cannot add new
container types here. Users with sufficient access
permissions can modify, delete, and add new
storage container types via Manage > Taxonomies. For more
information, see:
When you’re done making your changes, click the Save button in the button block at the bottom of the container’s edit page. AtoM will save your changes and redirect you to the view page for the current container, so you can review your work. You can repeat this process as needed until you are satisfied with your changes.
The container’s view page also includes a Delete button, which can be used to permanently delete the physical storage container. When clicked, AtoM will first present you with a confirmation page, including a list of related records from which the linked storage information will be removed when the container is deleted:
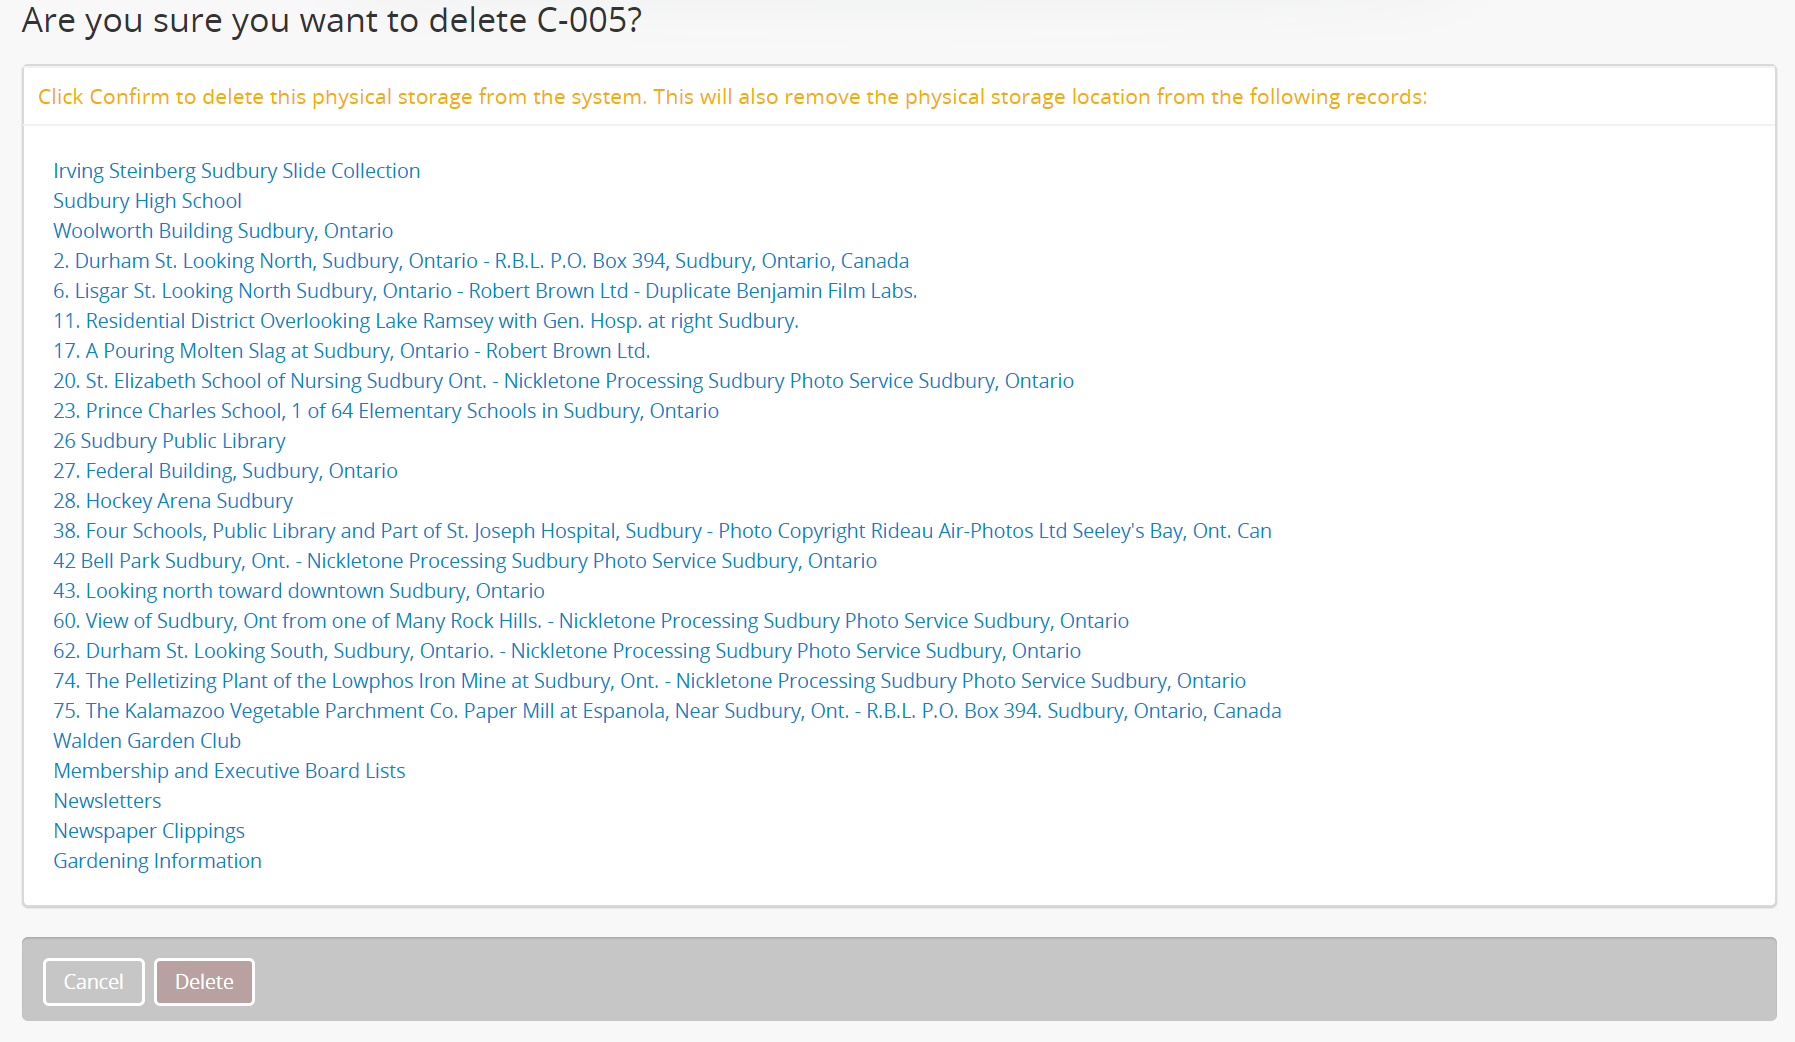
Click Delete again to confirm the operation, or Cancel to return to the view page for the physical storage container.
Important
Once you click Delete on the confirmation page, the physical storage container will be permanently deleted!
Related records will not be deleted by this operation, but the related storage information for this container will be removed from any linked archival description or accession record once the container is deleted.
Once you have made all your edits or deletions, you can return to the Physical
storage browse page using the Manage menu in
the AtoM header bar, and select “Physical storage.”
Generate a physical storage report
AtoM includes a global physical storage report that can be generated via the user interface from the Physical storage module and downloaded as a CSV file from the Jobs page. This report is focused on container relations (i.e. physical storage containers linked to other entity types in AtoM, such as archival description and accession records), and can also be used to identify unlinked containers. Export options on the report generation page allow users to choose which of these criteria should be included when creating the report.
For more information and detailed instructions, see:
See also
Visibility and physical storage
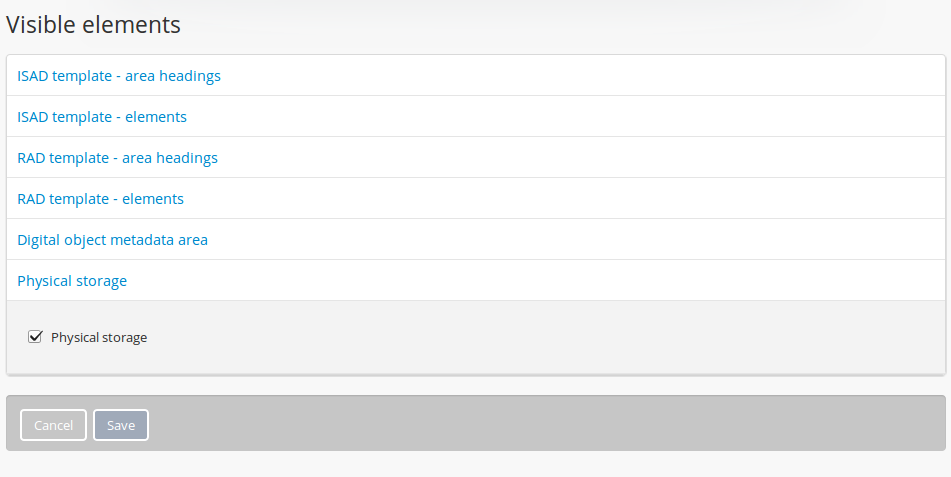
Administrators are able to choose to make physical storage information available to unauthenicated (not logged-in) users or not through the Visible elements section of the Admin menu.
To access the visible elements menu, click on the  Admin menu in the main menu located in the
header bar and select “Visible elements” from the
drop-down menu.
Admin menu in the main menu located in the
header bar and select “Visible elements” from the
drop-down menu.
Click on “Physical storage” to show the Physical storage check box. Check the box to allow unauthenicated users to see storage information or uncheck to disallow. Click save.
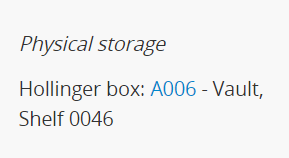
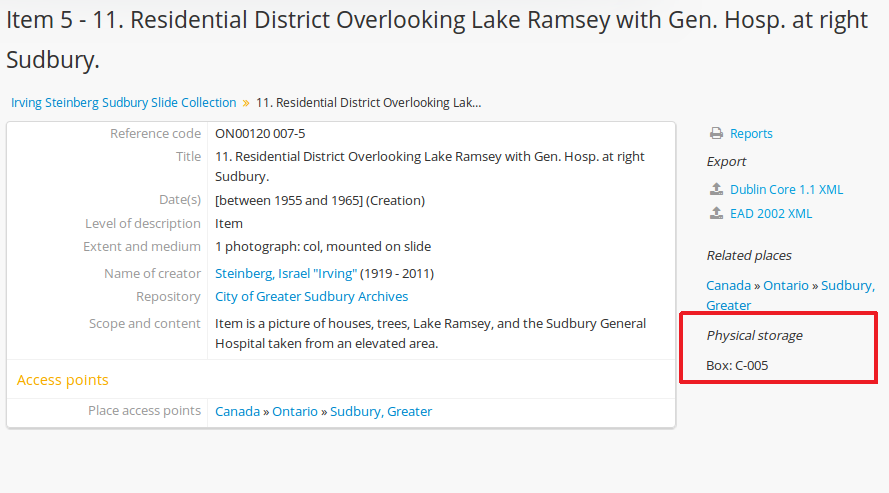
If visible, physical storage information will appear in the right hand column of the screen when viewing an archival description.
Note
These visibility settings do not impact accession record container visibility. Accession records are not accessible to public users, and the Visible elements settings only apply to unauthenticated (i.e. public) users.